Wednesday, June 29, 2011

Danish cord rails NO nails

 I did this pair of  Slat backs for my Aunt she wanted something different this is what I did. My Father-in-law has a set similar but the chairs are brown and the cord has a coat of Danish oil on it.
 My Father-in-laws chairs came from the factory like this. So I did this way for my Aunt.
Danish Cord without nails. As you can see there are no knots I unrolled the cord and using an old rope slicing technique my dad taught me http://www.machovec.com/rope/splicing/3strand_end2end_short.htm this site  explains it. I used my awl to open space to get the cut ends into the unrolled part of the rope. If you look closely you can find the splices as they are thicker then the rest of the cord. I do this with my Sea Grass seats also that way I can do the top and bottoms with NO KNOTS :-)

Friday, June 10, 2011

Rocker with 3/8 flatoval reed seat

 After the finish on the rocker dried I clamped two 1" x 3/4" boards to the front and back rails. This is done so that when you get to the end of your weaving it isn't so tight that you have a hard time getting your last rows in. As you weave you take them out one at a time so the weaving gets easier the last few rows are tight.
 I use masking tape to hold my reed to the back rail some people would use two at a time it is easier for me to use one at a time. (I should have taken a picture of this next step but wasn't thinking ahead). I run my wrap down one side rail and fill in the other side rail with a separate piece of reed which I tied in with the first two wraps from the other side. I use staples to slice in while I wrap you should over lap the ends about 6" and use at least three staples run the staples with the grain (anther thing I should have taken pictures of).
 This is how I splice in when weaving. I finish weaving with one piece then weave back to it with my new piece so the ends will over lap then side the new piece over the end of the last piece. I splice on the bottom most of the time because it is harder to splice on top and hide it neatly.
 This is the top of the finished woven seat.
 Here is the bottom it is a little more time consuming to weave the bottom like the top but that's the way I do it. Some people would do a 4x4, 5x5 or a 6x6 herringbone on the bottom that would be just fine. Some even do a checker board pattern. But you should do some type of weave one the bottom to keep the weave on top tight. Because as the chair gets used the reed will stretch and loosen up the weave.
Here is the reed with Cabot's natural Fiddlehead oil wood stain on it. In the can it looked forest green, but the stain is more of a wash then a paint so on the reed it dried a nice light green. I put a urethane finish on the seat to protect peoples clothes.

Tuesday, May 24, 2011

This is how and why I do fiber rush the way I do.

 I use masking tape to hold my starting coil. I also write my name and date on the tape this is one of two places I put this information. I use tape because tacks can weaken the rails I've replaced my share.

 I use what I call the English way of squaring a chair. This guy is good and I like to show people that want to learn how to fiber rush chairs his video. 
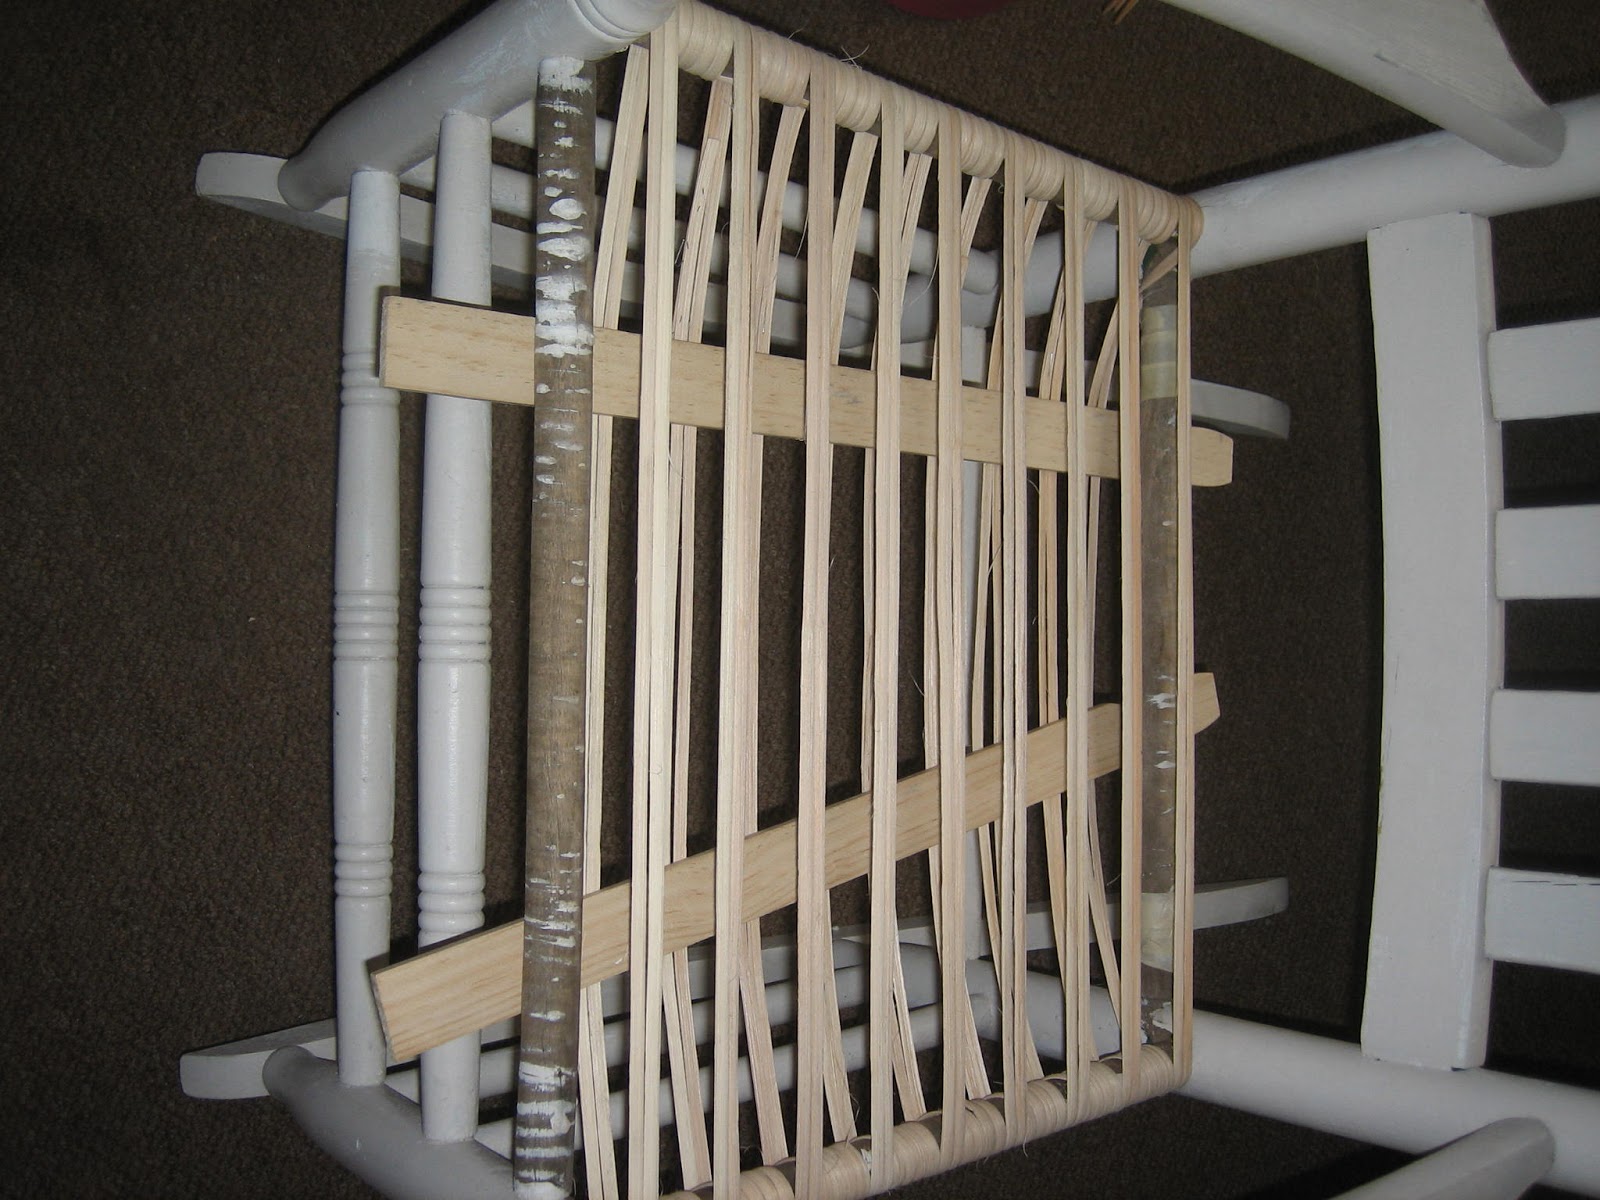
http://www.youtube.com/watch?v=AHu7lc5680w&feature=related    This is the U-tube video of how it's done. Squaring the chair seat needs to be done in order to start weaving if the front rail is wider then the back rail. My back rail was 11" my front rail was 14 1/2" . So I had to make up 1 3/4" on each corner. As you can see I checked the front rail with my tape measure to see when I could start weaving the whole seat.
 In the video they don't stuff the seat that is the only fault I have with this video. As you can see I use cedar shakes to stuff my chair seats. I but the thicker ends in the middle and It gives a rise at the center of my seats. I round the edges over so they won't cut into the fiber rush and shorten the life of the seat.
 This is where I write down all of the important information. My name and address phone numbers home & cell. what I was asked to do and how much everything cost. On the other side my clients name, address &  date I did the job. I like putting this information in because it gives the chair history. I like finding a chair that has a note in it or a coin. Infact I do put pennies in these chair seats also just started that a couple of chairs ago.
 Now I start stuffing with cardboard. It fills out the seat and I think it makes the seat look nicer I guess you could say it gives it body. I think it also helps me to keep the fiber rush cord tighter.
 This is a close up of the seat before it is shellacked.

Here is the completed chair with the seat shellacked.

Saturday, May 7, 2011

Mahogany Drop leaf table

 This is a Mahogany drop leaf table that I have to strip, put a new finish on and get 2 leaves for the center made I have to use Sapele Mahogany as Honduran Mahogany is no longer imported to the U.S.
 The space heater isn't needed to keep the table up it just happened to sneak into the picture while I wasn't looking.
 This is the table top with one side stripped.
 Here both sides are stripped. I have been using chemicals but would like to goto Soda blasting soon.

This is on of the drop leaves stripped. I will have more picture as the project progresses.

Here are the pictures I promised. The new owner sent these to me sorry it took so long to post them.


Sunday, April 24, 2011

Danish Modern High back chair with Sea Grass seat

 This is a project that is on hold right now as I have a Mahogany dinning room table and an End table Game table to finish before I do anything else. But these are pictures of 2 chairs I picked up. They seem to made of teak.


Wednesday, April 20, 2011

Herringbone Weave 6mm binder cane seat

 Seat needs to be replaced do to hole in back right hand corner. I would have liked to replaced the back and left the cane natural but the back was in good shape and just needed touch up paint.
 Better picture of the hole.
 I should have use 3 paint sticks per stack but in Finger Lakes Fan Weave I've only used 1 per stack and I was fine. But this Herringbone tightens more. I also used the 5X5 herringbone on the bottom I think I may use the 5X5 square pattern next time As the herringbone on the bottom seams to tighten things up more then the the square pattern does.
 I would have like to put more cane in the gussets but the side rails prevented me from getting under the wrap cane.
 Here the chair is all painted I would like to have not done so but it would have looked strange. I told the customer that the paint will most likely chip or flake off in time.
All of my splices are on the bottom. I stapled them all the wrap splices and over lapped all the weave splices.

Thursday, April 7, 2011

Porch Rocker with a 1/4 Flat Oval reed seat


 1/4 " Flat Oval Reed Seat

 I cut it out with heavy scissors
 I use 5gal. paint sticks to allow me the give I need for shrinkage. I ran a separate strand of reed down one side to fill in the gaps  left by going back & forth and only being able to wrap the one side  


 I measured the front 18 1/2"and back rail 15 1/2" subtracted the two came up with the overage 3" of the front rail divided that in half 1 1/2 and marked the side rails. I should probably start in the middle but, HEY it's going to look the same anyway.
 Wove the reed from one pencil mark to the other. Now all I have to do is fill in the sides.
 One side done
 Finished chair.
I like my chairs to look as good on the bottom as they do on top.....

Wednesday, March 16, 2011

Soda Stripping Furniture

I am interested in soda stripping furniture. I would appreciate any information on equipment. I would also like to know if there is any damage to the wood during this process.